Answer Card
Buyer Decision Summary
- Problem
- Model-only sourcing can still create wrong-part, wrong-year, or wrong-version risk.
- Best control
- Confirm OE number, VIN, build year, side, connector, and old-part photos before quote.
- Best buyer fit
- Global export buyers workshops and parts shops
- Brace support
- Jordan checks OE / VIN / old-part photos, confirms stock or source options, and routes mixed-order quotes to WhatsApp.
- Next step
- Send OE / VIN / photo on WhatsApp
Quick takeaway
With bumper skins, a lower unit price often stops looking cheap once fitting time, adjustment work, and repaint risk are added back in. A 6-point evidence check helps control that risk before release.
Benchmark note: The 6-point bumper check is a Brace fitment-control routine used for visible collision parts. It is a practical inspection method, not a blanket claim about all bumper suppliers.
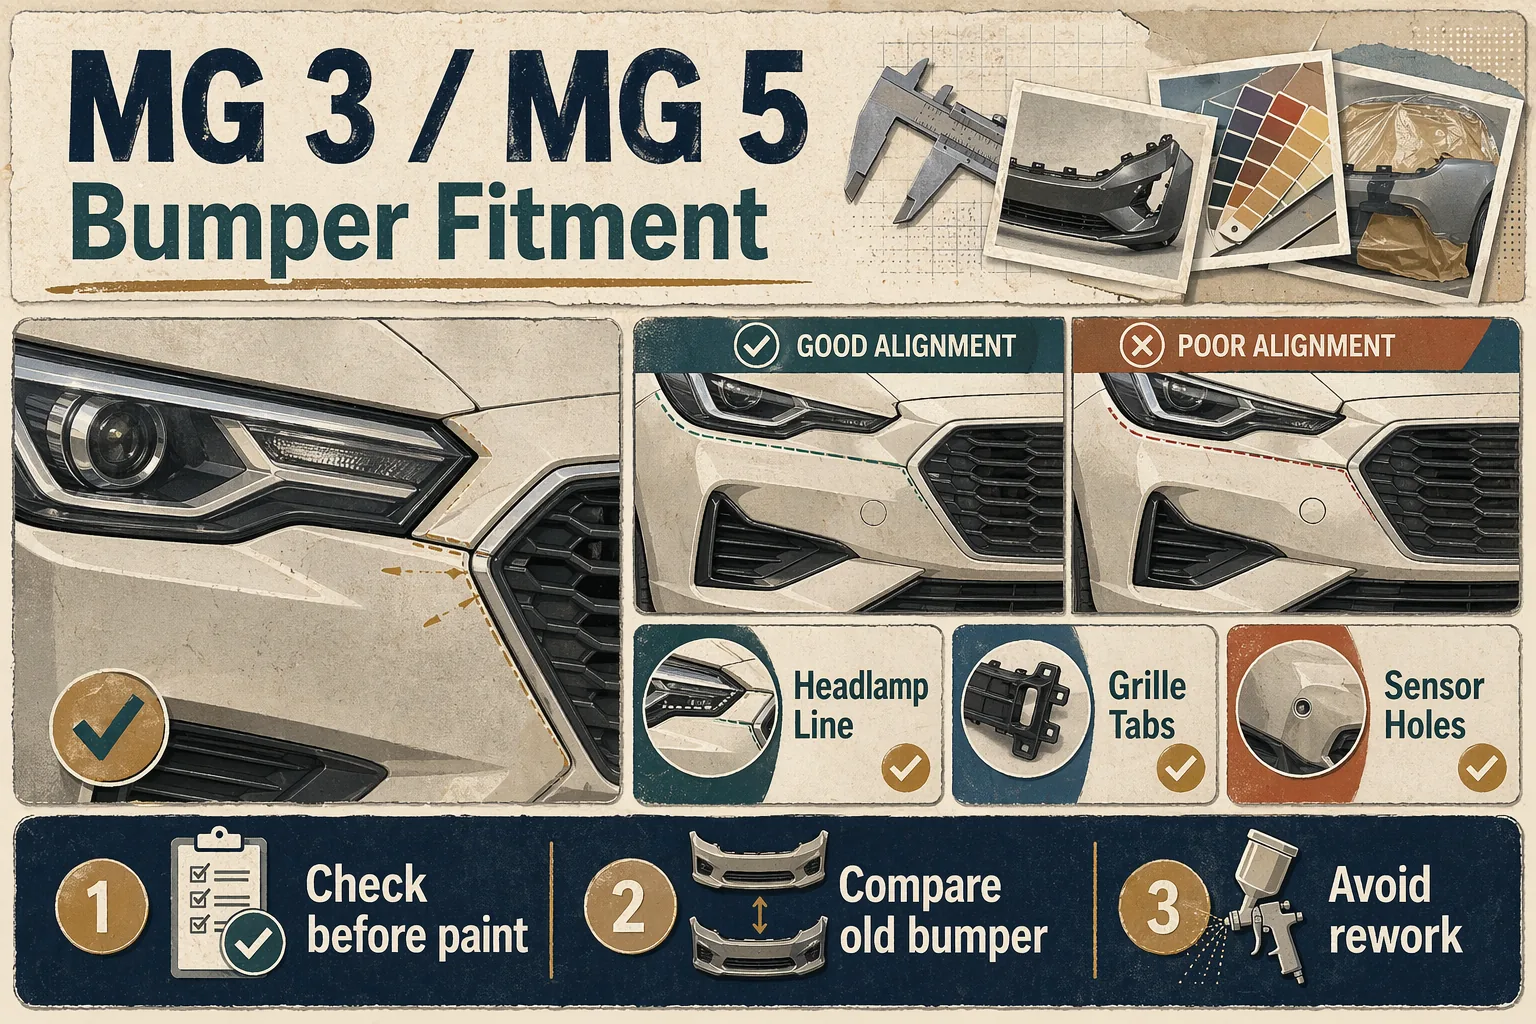
What does headlamp-line fitment really involve?
In practical terms, headlamp-line fitment is the visible and structural relationship between the bumper, headlamp, grille, and side bracket. When this interface is off, panel alignment, clip seating, and finish quality usually start failing together.
Where do low-grade bumper copies usually fail?
Most failures come from small geometry differences rather than overall shape. Headlamp-edge curvature, grille-tab position, side-bracket angle, lower-lip profile, and sensor-hole alignment can all be slightly off. Those differences may look minor in photos but often turn into visible mismatch or extra refit time during installation.
Which six points should be confirmed before release?
| Checkpoint | What to inspect | Proof needed | Main risk |
|---|---|---|---|
| Headlamp edge | Gap and contour match | Close-up comparison photo | Most visible mismatch |
| Grille tabs | Tab position and clip profile | Old-bumper comparison | Clip/installation failure |
| Side bracket | Mounting angle | Side photo | Panel alignment drift |
| Sensor holes | Hole position and shape | Front close-up | Sensor/trim mismatch |
| Lower lip | Lower contour | Lower-angle photo | Finish/undertray conflict |
| Old-part reference | Version consistency | Side-by-side photo | Wrong variant selection |
How should workshops run the first 90-day bumper trial?
- Do not release bumper skins from model name alone.
- Request front, side, and old-bumper comparison photos at the start.
- Confirm headlamp-line geometry before paint approval.
- Verify grille-tab and side-bracket details before packing.
- Treat unproven low-grade lines as high rework risk.
- Track supplier batches and scale only after consistently clean fit outcomes.
What should buyers track in the first 30 days?
| Metric | Sign the process is holding up | Sign to pause |
|---|---|---|
| Fit evidence | Full 6-point proof before release | Loose-part photo only |
| Rework pressure | Stable fitting/paint cycle time | Added trim or refit hours |
| Version accuracy | Build year and variant confirmed | Wrong-version dispatch events |
| Supplier consistency | Similar batch quality across jobs | One-off fit success only |
| Claims handling | Ownership within 48h | No resolution path after 72h |
Common questions
Is headlamp-line fitment more important than bumper price?
Yes. Refit and repaint cost can erase a unit-price advantage quickly.
Can one front photo confirm bumper fitment?
No. You also need side-bracket, grille-tab, lower-lip, and old-bumper comparison evidence.
Should workshops stock low-grade bumper skins?
Only in controlled low-risk cases where trade-offs are explicitly accepted and documented.
What is the minimum proof before release?
Headlamp edge, grille tabs, side bracket, sensor holes, lower lip, and old-bumper comparison.
Is one successful order enough to repeat-buy a supplier?
Usually not. Confirm consistency across multiple jobs or batches first.
Operational verdict
For MG 3 and MG 5 bumpers, the most reliable way to reduce rework is release based on fit evidence, not quote speed or generic photos.
Public references
Buyer Downloads
Use This Guide In A Real RFQ
RFQ Template
Copy This RFQ Format
Brand / model:
Year:
OE number:
VIN:
Old part photo:
Quantity:
Destination:
Need photo confirmation before shipment? Yes / No